How to Stream the Rugby
How to stream pretty much any sport that has a pitch, oval or field.

Short Version:
You will need a Camcorder with Zoom an HDMI a game capture GameCapture Device a (decent) Laptop , drivers for the GameCapture device OBS Studio free software, Decent internet and a You Tube account.
!!!DO NOT USE MUSIC, PLAY MUSIC ON THE PA OR ALLOW ANY SORT OF MUSIC ANY WHERE IN EARSHOT OF THE STREAM OR YOU-TUBE WILL CUT YOU OFF !!!
Hardware Requirements:
- Camcorder with HDMI out.
- HDMI lead
- A Game Capture Device
- USB3
- A Decent Laptop
Camcorders are designed to record to a card, but most will just put out to HDMI – this is the feature we want.
HDMI comes in 3 sizes, normal, mini and micro. You need the right cable for your camera!
I use the phrase ‘game capture’ as these gadgets are used by computer gamers to capture their gaming to you tube (yeah weird isn’t it – don’t knock it its brought the price of streaming right down!)
USB please note USB is slow in computer terms. It comes in 3 types, USB1 – too slow, USB2 – too slow USB3 Just about fast enough.
Resizing / encoding video is hard on computers. Full HD is a hell of a lot of data, to process, and it has to happen real time. I did fine with a 3rd gen i5, but I do have a fast SSD disk. Conventional disks can be too slow for big video files.
Software Requirements:
- OBS Studio (free open source streaming software) PC or Mac
- A youtube account with live streaming (not on by default)
- A Decent internet connection
There are other bits of software out there, mostly commercial, OBS Studio however does everything I need and its free.
I have had a youtube account for a long time – with a good reputation for not pirating stuff. New accounts won’t be allowed to stream.
OBS can do image overlays and webpage overlays – logos scoreboards etc.
!!! INTERNET PERFORMACE !!!
WiFi – ‘i.e’ wireless computer networks. These were designed for Short Range, they are programed to kick down to slow mode on weak signals. You WiFi may kick down to FAR slower than even your even an ADSL connection let alone an NBN. Understand WiFi before you stream over it, WiFi doesn’t go through water (people are mostly water!) or metal, trees, security screens etc. Also If your mate wanders to the loo with his mobile in his pocket, and he’s on wifi network will slow YOU down as it tries to talk to HIM at extreme range! Do not rely on it! Run a cable!
The ‘A’ADSL stands for Asymmetric – your download is quicker that you upload – we’re upload all lot standard definition only on ADSL (if that).
NBN is Asymmetric too Tier on is only 1 meg upload – Not enough! Rugby park has 10 meg up (tested) my tier 2 5meg (tested)
!!! LAPTOP PERFORMACE !!!
Modern computers are smart, they slow down the processors when its not needed, they go to stand by when not attended. Your laptop will chew through its battery MUCH faster than normal doing this, I recommend power and the charger. My normal 6 hour battery was 50% in 80 minutes. The camcorder will not be recording – it will probably try and go to sleep as well. You need to turn all your power management off.
SETUP:

Camera
HDMI is a just a lead, it can carry a whole plethora of signals. Like all things the Americans do it differently American formats end in i ours end in p my AverMedia GameCapture portable seems pretty tolerant.
I’ve decided to stick with HD – that’s 720p or 1280×720 you could go for other youtube live supported formats
If you camera is already outputting 720p your computer will not need to resize it! If its putting out something ending in i (eg 1080i) that’s different from what YouTube accepts, again your computer will have to work hard to translate it.
Go through all your camera’s menus – Eco mode, Power saving, auto off anything like that – turn it off.
My camera had a demo mode – where if left not recording it started a slidehow of its feature- turn that off too.

 Game Capture Device
I’m using an AverMedia Live Gamer Portable ($150 on line) this gadget was designed to sit between your xbox and the telly and record/stream computer games. As such its pretty simple – even a second row can operate it. Download “Application and driver” and “Stream Engine” run them both and then plug it in.
USB3 ports are BLUE most laptops only have one or two and some slower usb2 ports. If you laptop’s fashionable they will not be coloured blue and you’ll have to RTFM. (read the friendly manual)
The Live Gamer Portable has an input for audio – mine was too quiet for just plugging a microphone in – you need some kind of pre amp or mixer. You can either use the camcorder mic (HDMI) line in jack (Audio In) – This is the only setting I touched.
The aver media Live Gamer will accept RGB analogue signals from older or professional kit – not tested!
Laptop
(Windows 7 example windows 8 or 10 google it)
Control Panel > Hardware and Sound > Power options
On a stock windows drop down “Show Additional Plans”
![]()
Then choose High Performance
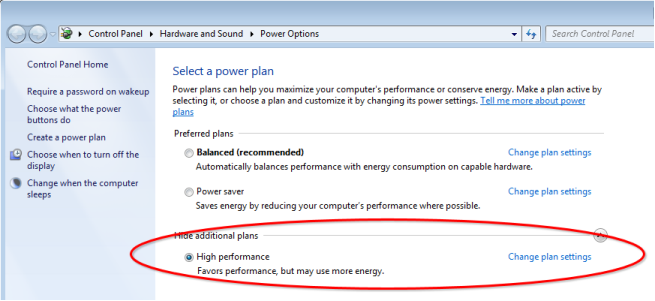
Change Plan Settings, then ‘turn off display never’ and ‘put computer to sleep never’

So long as your on mains you’ll be fine now. Laptops on battery may have manufactures power systems that throttle.
Obs Studio (the tricky bit)
“OBS ‘Open broadcaster Software’ comes in 2 version OBS (now ‘OBS Classic’) and ‘OBS Studio’ these settings are for OBS Studio careful what you google!”
 Just Run the installer. The only real question it asks is “do you want the browser plugin” – you do its handy for overlays and scoreboards.
Once installed – agree to terms and run the program start > OBS Studio (64bit)
 (if it doesn’t work use OBS Studio 32bit instead).
MAIN SCREEN:

Nothing will be set up on your screen (and I made mine dark background). Nothing will work until you do.
There’s some buttons bottom right. Settings is the most important one, but I’ll explain what we are looking at. The main bit in the middle (showing a rugby ball on a testcard is the preview).
SOURCES
The “Sources” are layers, of video images etc. In the shot above the ball test card is an image – the BOTTOM layer. All the others are on top of it. They are (in reverse order)
TestCard – bottom layer emergency fall back image when video fails or is hidden!
VGC (video game capture) – this is the video stream
NT Rugby Logo this is the NTRU logo bottom right (this is above the video so always visible)
Webcam (greyed out and eye) this is my webcam its greyed out and hidden click the eye to toggle.
SCORE this is the top most layer, this is my scoreboard and timer.
You can hide or show various things here basic editing!
MIXER
This is an audio mixing desk like karaoke or a mic PA.
Sliders are volume and you can mute various things.
BUTTONS
Bottom right are the Start Streaming and Start Recording buttons.
Nothing will happen when you start streaming – no settings.
Start recording will probably work – this saves it as a file..
SETTINGS: 
No changes in general (this is Dark theme)
Steam:
Select Youtube / youtube gaming
and primary ingest server
The Stream Key is the from Youtube – its like the password. See section on “youtube Setup for where to get this”
Output:
This selects the quality of the stream bitrate.
Encoder should be h264, it’s the most common video codec and best for compression.
Video bit rate, more is better but uses more internet. These are low end for 720p.
Audio bit rate, more is better, don’t go less than 128.
Video bit rate + audio bit rate + a bit = upload e.g. these settings will need about 3 meg of upload.
Record Path, Do not set this to a USB drive, save it to your internal (fastest) hard disk. This is where the record button will save files.
.mp4 files are more compatible. Install VLC http://www.videolan.org/vlc/download-windows.html plays anything.
Audio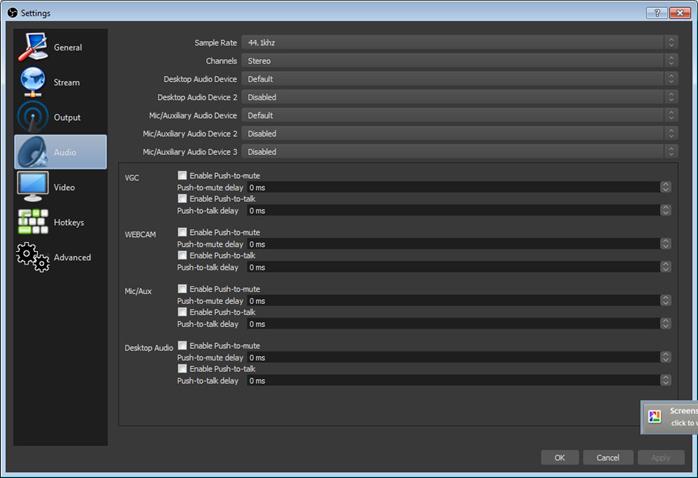
Nothing Changed here, configure your audio sources
Video:

 This sets the video size 1280×720 = 720 p Output must be set to a resolution supported by youtube streaming
“Bicubic” is mid range laptop. If you have a POWERFUL gaming laptop you may be able to use Lanczos. If your laptops old or slow use Bilinear.
Obviously if you set your camera to output at 720p your computer will not need to resize it.
Other settings are not needed for basic streaming.
Add Source(s) to OBS
You will need to add a capture device to OBS – No screenshot. Hit the + sign in the Sources section, select “Video Capture Device” as the source type. Select Create New and give it a name, and hit OK.
Select your capture device from the Device drop down, if you Game Capture Device is not listed look to make sure you did the drivers correctly and its on and connected.
Adding other souces.
Add a source of image to add a logo.
Add a source of browser source to display a website overlay (E.G. Scoreboard or News ticker, anything you can write or find in HTML.)
Set Up Event In Youtube
We are looking for two things here:
- A LINK we can advertise
- The ‘stream key’
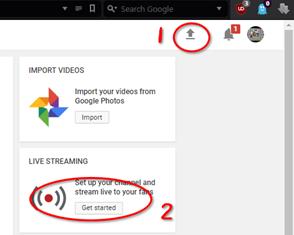 Log in to youtube, your looking for “Creator Studio” it hard to find.
Go Upload (top Right) then Live Streaming Get Started
!!! Your youtube account must have live streaming !!!
Not all accounts do, we suggest using the NTRU account.
Once in Creator Studio Chose Events then New Live Event

Enter name Date type info (no Pic for this) then save with Create Event Button.
This will take you to the event: there’s 4 tabs, Info is for LINK, time date, Ingestion is for the stream key and Live Control is for the day. We need that key got to Ingestion Settings.

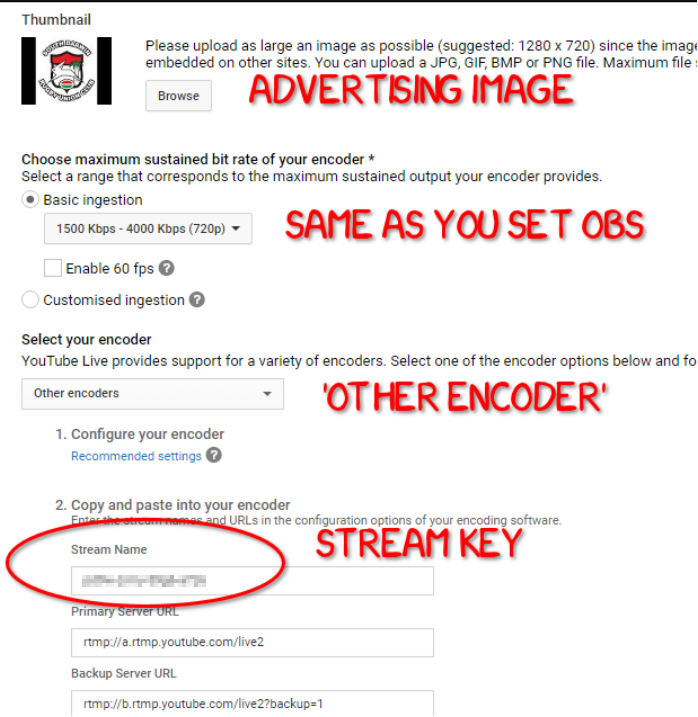
Once you put the Key into OBS Studio you are ready to go live.
GO LIVE!
In OBS
1: press the ‘Start Streaming’ button in OBS.
2: got to ‘live Control Room’ in YouTube.
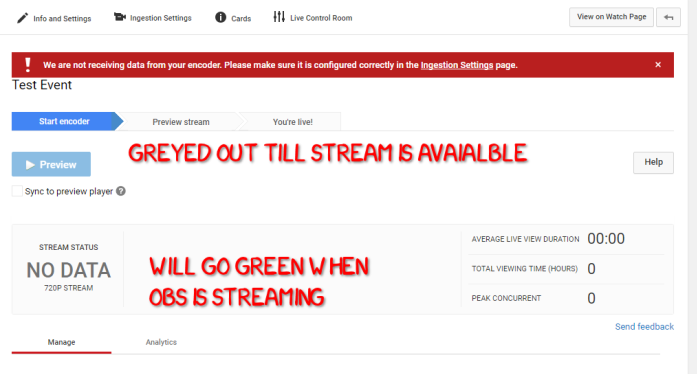
Once you start OBS the Stream Status Will Go Green the Preview button will light up.
Once you happy with the preview. Go live!
!!! ONCE YOU GO LIVE DO NOT STOP, YOU CANNOT RESTART !!!
